Create a Table
-
Select the parent element, right-click and select .
The Create Table dialog appears.
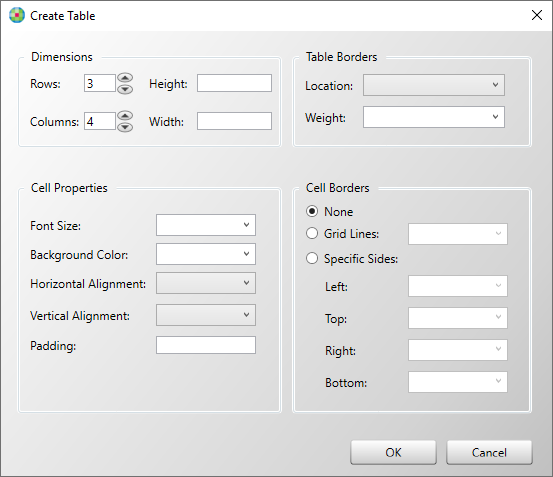
- Determine the number of Rows and Columns in the respective fields.
- In the Table Borders section, perform the following:
- To add a border to the table, click the Location dropdown and select one of the following:
- None
- All
- Bottom
- Top
- Sides
- Top and Bottom
- Click the Weight dropdown and select the desired thickness:
- 0.5
- 1.0
- 1.5
- 2.0
- 2.5
- 3.0
- To add a border to the table, click the Location dropdown and select one of the following:
- In the Cell Properties section, determine the following:
- Font Size
- Background Color
- Horizontal Alignment
- Vertical Alignment
- Padding: sets the padding for each cell in the tableNote:
- Padding must be set in points (ex. 6pt). If you do not set the
padding amount correctly, the Padding control will indicate an
incorrect format with a red border.

- Padding can accept up to four values (ex. 6pt 2pt 2pt 6pt) indicating top, right, bottom and left sides, respectively.
- Table padding has specific precedence. If the padding does not
look as expected, realize that the precedence for padding is in
the following order, highest to lowest:
- Cells
- Row
- Column
- Table
- Padding must be set in points (ex. 6pt). If you do not set the
padding amount correctly, the Padding control will indicate an
incorrect format with a red border.
- The Cell Borders section allows you to determine the thickness of cell borders; select one of the following:
- None
- Grid Lines
- Specific Sides