Document Options Screen
The Options Data Fill-In allows the user to Select a Phase and Form to View First. Selecting Options Data Fill-In on the submenu displays the Document Options screen, as shown below.

The following list describes the features of the Document Options screen.
- Select a Phase
- Provides a list of the various phases to which documents are associated.This allows you to change the phase of the document to work with. Each document is associated to a phase. Phases for 7a loan transactions are Application Documents, Closing Documents, and Post-Closing Documents. When the Document Phase is changed, the Document Options expanders and questions dynamically change and reflect those questions pertinent to the documents associated to the phase selected. For Express Loan, an additional phase, Authorization, is available for the express loan authorization document. For more information, refer to Document Phases.
- Form to View First
- Allows you to select a default form to load in the document view to quickly
review or create a PDF. This drop list displays all forms available for the
phase selected based on the options specified. Selecting a form causes that
form to load first and is displayed in Document View upon clicking VIEW
DOCUMENTS.
- The first form seen in the Document Drawer for that phase/options selected is the default.
- Once a different form is selected, that selection remains while working within different pages of the transaction. Once exited and recalled, the selection reverts back to the default.
- If a form is selected to load and either a change to the data within the transaction or a change to document options causes that form to no longer select, the form to load reverts back to the default.
- Document Options Expanders
- Contains data fill-in questions. For instance, clicking the row Transaction Data, expands and list one or more set of questions for you to answer which is used to determine what documents to auto-select (see example below). The questions and values entered may also drive language required for certain documents depending upon the answers to the questions.
- VIEW DOCUMENTS
- Evaluates all documents needed and presents the Documents page.
Answering Questions on the Screen
Each question on the screen can be reviewed, and you can enter or update information as needed.
- Checkboxes – used for indicator questions
- Dropdown lists – select from a set of predefined values
- Text fields – manually enter a value

After reviewing and answering all necessary questions for the loan transaction, you can select VIEW DOCUMENTS to access the documents for that phase. To preview a form, select the desired document from the dropdown list. A preview of the selected form will be displayed automatically.

- In addition to using the standard scroll bar to navigate up and down for a single document, the following keyboard shortcuts can also be utilized: Page Up, Page Down, Ctrl+Home, Ctrl+End, Enter key (for a carriage return).
- The document must have focus for keyboard shortcuts to function. To gain focus, click in any editable field.
- Document Name
- The name of the currently viewed document.
- Document View
- The main part of the page which renders the document in the format/layout
designed and allows you to enter data directly in the document.Note:
- By default, the first document listed in the Document Drawer is loaded in Document View for each phase.
- Fields that are editable to enter data are highlighted with blue background. When tabbing through fields, the field with focus changes to white with a blue outline.
- When a check box has the focus, it changes to a blue highlight.
- Expand/Collapse
- Certain documents may feature an expand/collapse function. Selecting the (+)
symbol will open the section, revealing the language related to the expanded
item, and selecting the collapse button (-) will hide the language.
- Conditions
- Some documents may include conditions indicated by a question mark (?) in
the document view. Clicking the question mark icon will prompt you to answer
a question or provide information that helps determine the language and
formatting for that section of the text.
- Data Entry Drawer
- It organizes all available data fields from the document and displays them
in a list view on the left side. Click the gray area of any labeled expander
to display or hide the data items. Click the Data Entry expander arrow, at
the top left of the document's body, to hide or show this section.
Data can be entered in the data entry view. The selected field in data entry highlights with blue a border, and all corresponding fields in the Document View that relate to the field in focus are also highlighted.
Note:- The field in Document View is highlighted according to the field that is currently focused on in Data Entry. (see image above).
- Right Pane-Scroll Indicator: Hovering over the colored bar in the right document scrollbar displays additional information about the scroll location of the highlighted fields. The bar lines up with the scrollbar when the page that relates to the field in focus in data entry is in view.
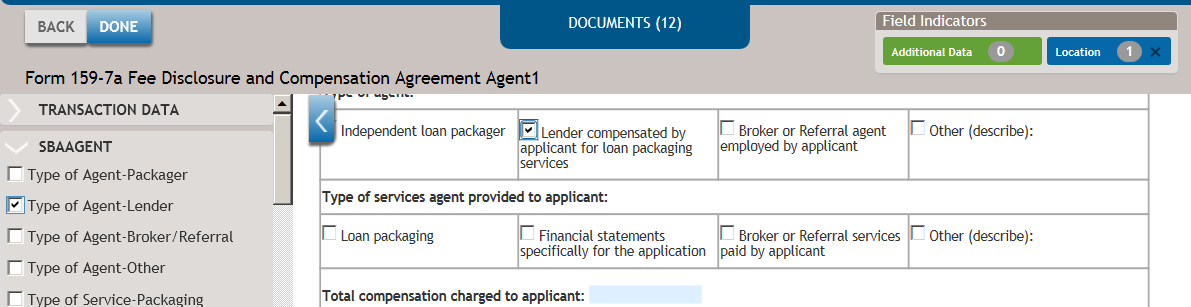
- Field Indicators: Click the green Additional Data or the blue Location boxes to temporarily remove the location indicators from Document View. The indicators display again once a field is in focus in data entry.
- Documents
- Also called the document drawer. Displays the total number of documents auto-selected in parentheses. Click the tab to open or close the document drawer. For more information, refer to the following section, Document Drawer.
- Back to Document Options
- Saves any information entered and returns you to the Document Options page.
- DONE
- Collects all information and generates documents in PDF format, then
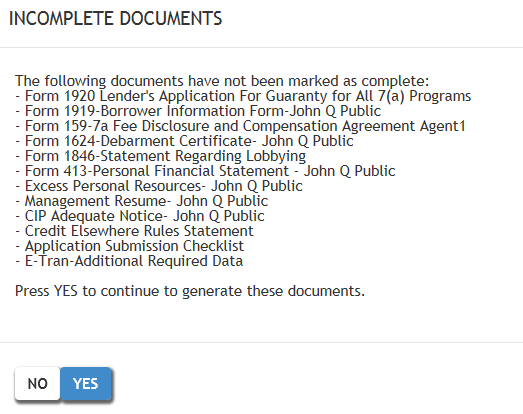
presents a Summary page.When you selct DONE, a message will appear if there are any documents with an In-Progress status. This message informs you about all incomplete documents, defined as those with an In-Progress status (see image below). You can click Yes to continue with generating the PDFs or click No to return to the Document page.
When you select DONE, a message will appear if documents have already been created as PDFs, asking whether you want to overwrite the existing documents You can select Yes to continue generating PDFs or select No to return to the document page.
If no documents are selected in the Document Drawer, you will receive the following message.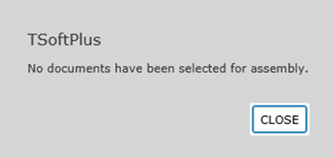
- Data Entry Validation
-
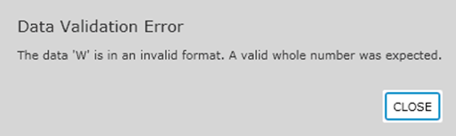
TSoftPlus validates the value entered by checking if it matches the required data type format. If an invalid data type is entered for a specific field, a message will be displayed. This message indicates the incorrect data type that was entered and specifies the valid data type that is required.
Clicking the CLOSE button clears the invalid entry and returns the cursor to the input field to enter a new value. Example:
- Default Data with Override Ability - Cannot Restore
-
Some fields in the documents will have default data but can be overridden if preferred.
Clicking in a field opens a text area to enter a new value that replaces the existing default. To revert to the original value, press the Esc key before leaving the field.
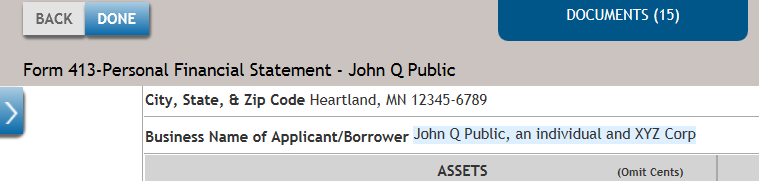
Concatenate Business Applicant Borrower Names: The following documents have been modified to concatenate borrowers' names and print all in the Applicant Business fields (see example below). The defaulted value may be overridden.- Form 1920-Lender's Application for Guaranty
- Form 159-7a Fee Disclosure and Compensation Agreement
- PLP Loan Authorization Transmittal
- Form 413-Personal Financial Statement