The list element allows you to insert a sequenced (ordered) or unsequenced
(unordered) list.
Sequenced List
To create a sequenced list:
- Right-click the element intended as the parent for the list and
select .
The list is created as shown in item 1 to the
right.
- Double-click the NO VALUE attribute value to display your
options (shown in item 2 at right) and select
Sequenced.
|
 |
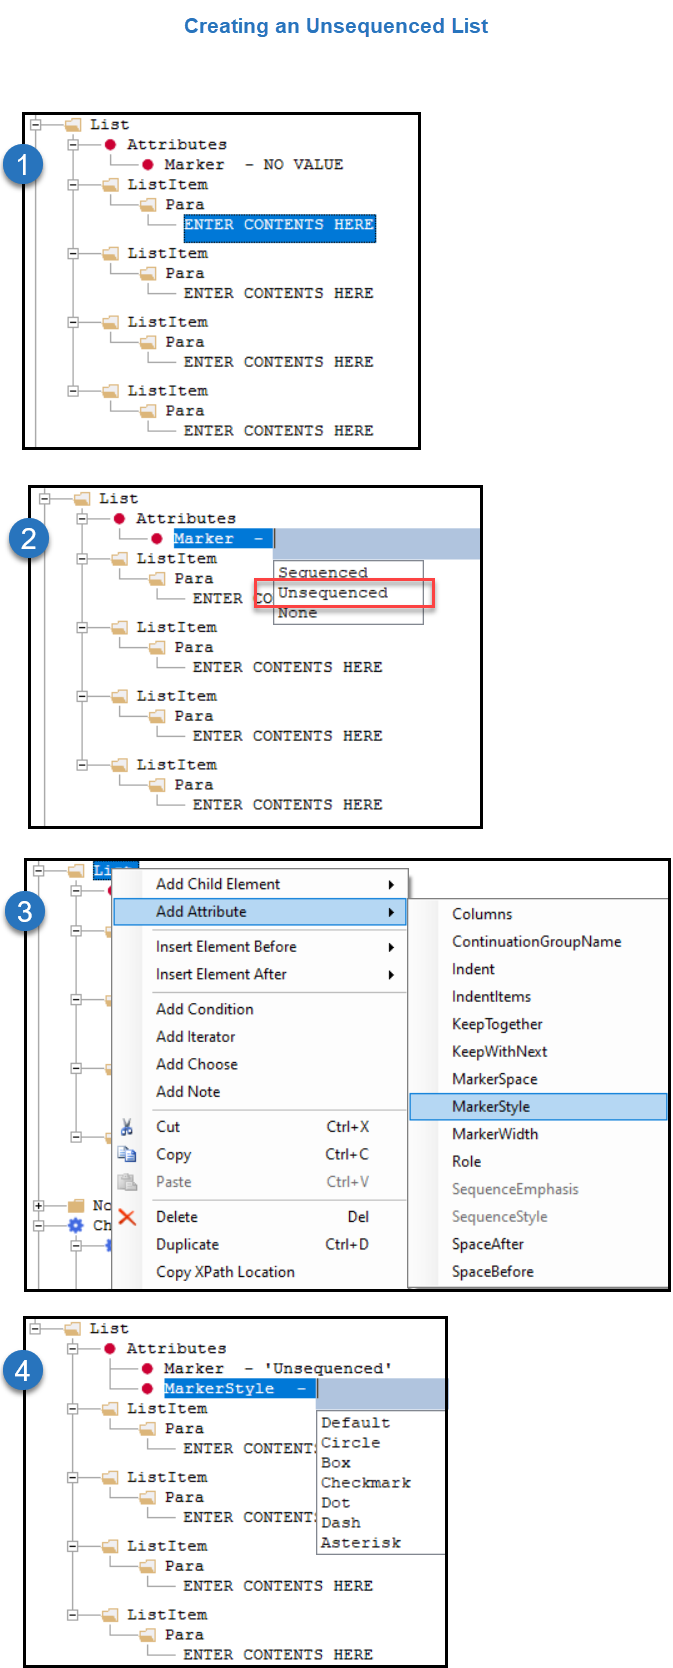
Unsequenced List and MarkerStyles
To create an unsequenced list:
- Right-click the element intended as the parent for the list and
select .
The list is created as shown in item 1 to the
right.
- Double-click the NO VALUE attribute value to display your
options and select Unsequenced.
- Right-click the List element and select .
- Double-click the MarkerStyle attribute and select the
desired style.
Note: The Default
value results in a slightly smaller Circle bullet
style.
|
 |
SequenceStyle and NumberStyle
Note: This procedure uses SequenceList as an example.
However, the procedure for NumberStyle (when available) is identical.
After defining the MarkerStyle, you have the option of inserting a
SequenceStyle element. SequenceStyle defines the formatting of the list
sequence (numeral, alphabetic, Roman numeral, etc.).
| To insert a SequenceStyle: Note: This example uses
capital alphabetical characters to illustrate usage.
- Right-click the List element and select .
Note: The SequenceStyle
attribute is available only after the MarkerStyle has
been defined as Sequenced.
- Double-click the newly created attribute to open the text editor
and select (double-click) the desired style.
The selected
style is shown assigned to the SequenceStyle
attribute. Optionally, manually type your
desired sequence style. The following formats strings and
options are supported. Supported Format
Strings:Important: When manually entering a format string, press the
Esc key to dismiss the drop list. This
prevents your entered text from being overridden by an
automatic selection.
| String |
Results |
| 1 |
1 2 3 4 |
| 01 |
01 02 03 04 |
| a |
a b c d |
| A |
A B C D |
| i |
I ii iii iv |
| I |
I II III IV |
Additional Formatting
Options:
| Character |
Result |
| . |
A. B. C. |
| { } |
{A} {B} {C} |
| , |
A, B, C, |
| < > |
<A> <B> <C> Note: when using < >, do not
use characters b or i as the string,
as this will result in an error from a known
limitation in the runtime engine. |
|
 |
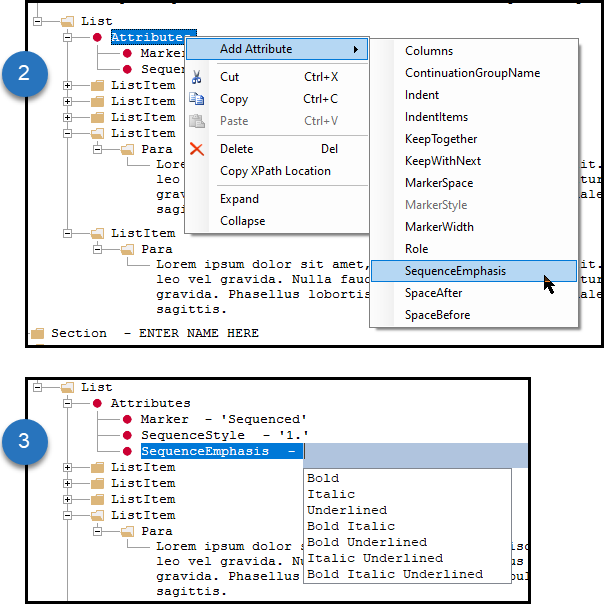
Sequence Emphasis
Sequenced lists can have emphasis added to the numbered marker to match the text
styling of the associated list item.
Note: This styling is
available only to sequenced lists.
|
To add emphasis to a sequenced marker:
- Create a Sequenced
list and add a Sequence style.
- Right-click the List's Attributes node and select
SequenceEmphasis.
- Double-click the "NO VALUE" text of the SequenceEmphasis
attribute and select the desired value.
|
|
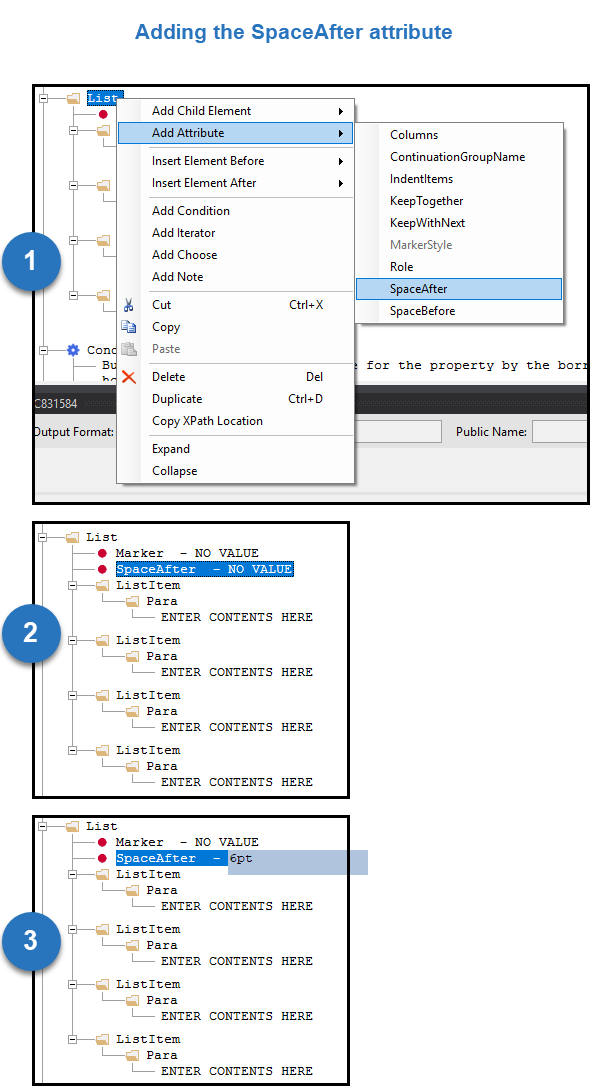
SpaceBefore and SpaceAfter
The SpaceBefore and SpaceAfter attributes allow you to add custom
amounts of space to List and ListItem elements.
A default of 2 points is applied to both List and ListItem elements. However,
SpaceBefore and SpaceAfter both overrule the default.
Attributes applied to ListItem take precedence over List attributes. For example, if
you specify a SpaceBefore of 4pt on the List and then on one ListItem specify a
SpaceBefore of 6pt, only this ListItem would have different spacing. All other
ListItems would be rendered with 4pt. The same is true for the
SpaceAfter.
| To insert SpaceBefore or SpaceAfter: Note: This
example uses SpaceAfter to illustrate usage.
- Right-click the List or ListItem element and select .
- Double-click the newly created attribute to open the text
editor.
- Enter the amount of space desired and press Enter.
Note: If SpaceBefore or SpaceAfter attributes
are set on the List element as well as ListItem elements and the
ListItem values are smaller values than the List value, the ListItem
attributes are ignored by Expere. This is intentional by
design. |
 |
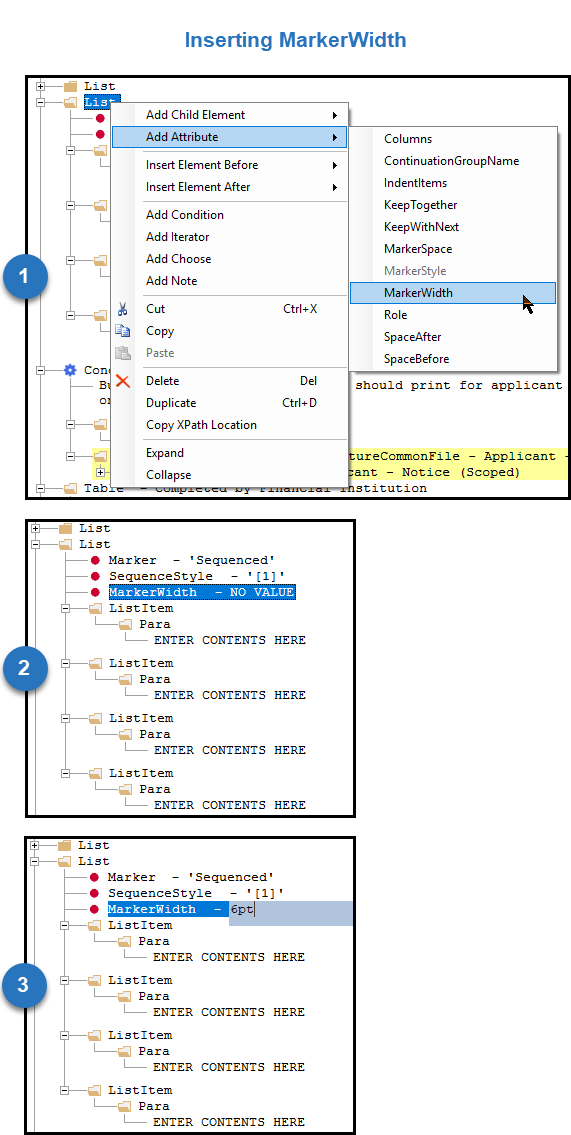
MarkerWidth and MarkerSpace
The MarkerWidth and MarkerSpace attributes provide more control over
width and spacing of the marker used within your list. MarkerWidth defines
how much width is alloted for the marker to reside in and MarkerSpace defines
how much space should be included between the marker and the ListItem content.
| To insert the MarkerWidth or MarkerSpace
attribute: Note: This example uses MarkerWidth, but
the steps for MarkerSpace are identical.
- Right-click the List element and select .
- Double-click the newly created attribute to open the text
editor.
- Enter the width desired and press Enter.
|
 |