Select And Generate
The Select And Generate option allows you to select and generate
documents for a request; this option does not deliver the documents to a specified
recipient. This action is a concatenation of two API calls, namely:
- Select
- Generate
When a request is submitted via a transaction XML, the DGS solution will perform the Select API call to identify documents/packages pertaining to the request. Next a Generate API call will generate the respective documents with the information provided in the request.
Click the Select And Generate option on the main Tool Suite page to begin.
- If you know your account ID, enter the ID in the Select or type in an account ID field. To remove the ID, click Clear.
-
To search for an account name or customer number, enter
an account name or customer number in the Account name/Customer number
field; click Search. The Account name/Customer number field will
return an account list with all of the accounts that contain any portion of that
search criteria. The accounts are assigned to you during your user account
creation in the Enterprise Administration application.
Note: Users can enter up to 255 characters in the Account name/Customer number field.
-
Select one of the document types below from the Document
Format dropdown; if no option is selected, the document type will default to
PDF.
- RTF
- Raw XML
- Tagged PDF
Note: Consider the following:- Tagged PDF Embedded Fonts is no longer supported as a Document Format.
- Do not select document format when merging EZ Config Data to preserve document format selections from EZ Config.
- With the exception of the Barcode option (PDF or RTF), the Ancillary Options section appears only when selecting PDF.
- Select a document type from the Document Format dropdown.
-
Enter a value in the Days to Expire field. Days to
Expire is used to calculate the length of time the transaction and
document data will be retained in our database. Typically, the value should be
between "1-90".
Note: The Days to Expire field only allows numeric values.
- Click the Choose File button to the right of Select XML to browse and select the transaction .XML file.
-
Clicking the Callback Required checkbox displays the
Authorization Type, Callback URL, username, and password fields:
- Select either a Username/Password or Token option in the
Authentication Type dropdown; Note: Users can enter up to 255 characters in the Username/Password fields.
- Enter a URI in the Callback URL field. Complete this field to receive
notifications that documents have been posted to the document rendering engine
as well as document status.Note: The Callback URL must be specified in either the database or request.
- Select either a Username/Password or Token option in the
Authentication Type dropdown;
-
Enter the Content Identifier
URI value, which consists of the Alias and Content Package; click the
"?" icon to access the Content
URI webhelp topic. Users may also generate a Content Identifier URI
that incorporates the alias for a fully resolved inline package by selecting the
Use Packages and Packets checkbox; select Generate a fully
resolved package for more information.
Note: The Alias is managed and maintained in the Document Generation Services management tool.
-
In the EZ Config Merge Options section, click the corresponding dropdown to
insert a logo or product from EZConfig Default Data into the current transaction.
From the dropdown, select one of the following:
- Logo;
- Click the Load Data button to load an option in the LOB dropdown.
- Select a Line of Business from the LOB dropdown.
- Default Data Only:
- Click the Load Data button to load an option in the LOB dropdown.
- From the Available Products pane, click the right-arrow button to select the desired products from the Available Products list and transfer them to the Selected Products list.
- Logo and Default Data:
- Click the Load Data button to load an option in the LOB dropdown.
- Select a Line of Business from the LOB dropdown.
- From the Available Products pane, click the right-arrow button to select the desired products from the Available Products list and transfer them to the Selected Products list.
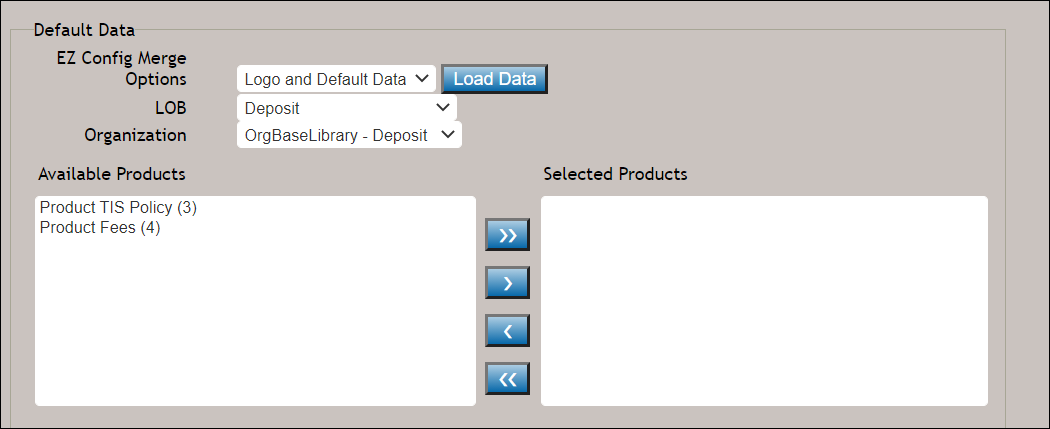
- Logo;
-
The Ancillary Options section allows you to incorporate
the following additional features to the documents (see list below):
Note: The textboxes used with the Watermark > Text, ESignature Tooltip, ESignature Initials Tooltip, and the Logo Alternate Text fields allow up to 255 characters.
- Watermark checkbox: click this checkbox to display
a subsequent field that allows you to place specific user-defined
Text as a watermark across your documents. Selecting the
Watermark checkbox allows for the following additional
functionality:
- You can determine the location of the watermark by selecting Center, Bottom, or Top from the Location dropdown. By default, the watermark appears in the center of the page.
- Click the Rotate checkbox to rotate the watermark 45 degrees. Clicking the Rotate checkbox automatically places the watermark in the center of the page.
- By default, the Watermark checkbox and its supporting functionality (Text and Location) are disabled for use. All generated documents will appear with a "Non-Recordable" watermark in the center of each document.
- Barcode
checkbox: click this checkbox to define a Pattern and select a
specific barcode Type from the dropdown. Users can also access the
Barcodes webhelp via the
"?" icon. When selecting Barcode and a corresponding barcode
Type, select either of the following:
- Select one of the following options from the
Justification dropdown:
- Left
- Center
- Right (default)
- Use the Use Cover Page option to indicate that cover pages will be produced for all documents that cannot handle barcodes in the tagline; for example: documents using integrated disclosure stylesheet and select static documents.
- Use the 1st Page Only element to place a barcode on the first page only of a document.
- Select one of the following options from the
Justification dropdown:
- Merged Pdf checkbox: click this checkbox to return the documents as one master PDF file.
- Merged Pdf by Discrete Party: click this checkbox to generate multiple individual and merged PDF documents based on the discrete party or parties specified for each document.
- Merged Pdf with Doc Instances: click this checkbox to return the merged PDF but also include a DocInstance for each document that was generated.
- Merged Pdf with Doc Instances by Discrete Party: click this checkbox to return the merged PDF but also include a DocInstance for each document that was generated based on the discrete party or parties.
- Merged Copy Pdf: click this checkbox to set the output as a copy of all individual PDF files and a PDF comprising a merged grouping of the individual documents in a package.
- Merged Copy Pdf by Discrete Party: click this checkbox to generate multiple merged PDF documents based on the discrete party or parties specified for each document.
- ESignature and Field Support checkbox: select any
of the following:
- Click the ESignature Coordinates Only checkbox to suppress eSignature fields on the form.
- Enter text in the ESignature Tooltip field to add tooltip help.
- Use the ESignature Date Support checkbox to enable or disable the date field in an eSignature. Clicking the checkbox enables the date field.
- Enter text in the ESignature Initials Tooltip field to add tooltip help.
- Click the Non-Signature Field Coordinates Only checkbox to suppress other Non-Signature fillable fields, including textboxes and checkboxes on the form.
- Click the WKES eSignature checkbox to render all initials fields as a fillable text box on the document.
- AnchorText checkbox: select to add line anchors to the documents.
- Duplex checkbox: select to print documents on both sides of the paper.
- Logo checkbox: click to add a logo to the header of documents
in a package. Select from the following:
- Select Logo: clicking the Choose File button allows you to select
the following image types depending on either a .PDF or .RTF output:
- .PDF: .jpeg, .bmp, .gif, .png, and .tif
- .RTF: .jpeg, .bmp, .gif., .png
- Justification: select either Left, Center, or Right. The default value is Left if no value is entered.
- Placement: select either First Page, All Pages, or All Except First Page. The default value is All Pages if no value is entered.
- Height: height of the image in inches. If not selected, the image scales automatically.
- Width: width of the images in inches. If not selected, the image scales automatically.
Note: You must select either the Height or Width options at a minimum. - Select Logo: clicking the Choose File button allows you to select
the following image types depending on either a .PDF or .RTF output:
- Watermark checkbox: click this checkbox to display
a subsequent field that allows you to place specific user-defined
Text as a watermark across your documents. Selecting the
Watermark checkbox allows for the following additional
functionality:
- Click the eOriginal checkbox to enter your eOriginal username and password in the corresponding fields.
- In the TRID Merge section, click the TRID Merge checkbox to merge closing disclosures and related addendums.
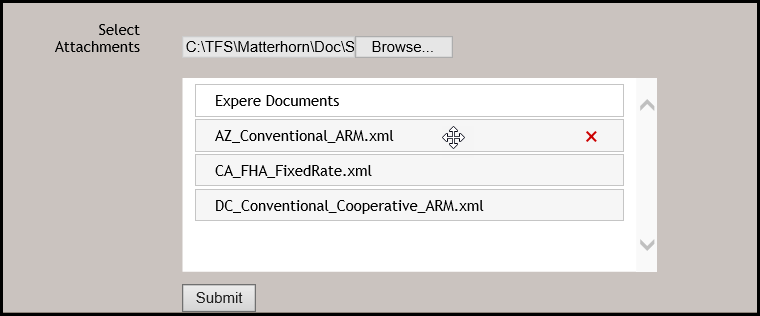
- Use the Select Attachment options to add any supplementary PDF files; e.g. a PDF of a house appraisal. Specify the Attachment Position of these documents by dragging the individual attachments either up or down in relation to the Expere Documents to specify the document order in which they will be attached. To remove an attachment, hover over the desired attachment and click the red X.
- Click Submit to advance to the Get Generate Results page. See Generate Results for more information.