Decision
Adding  to a
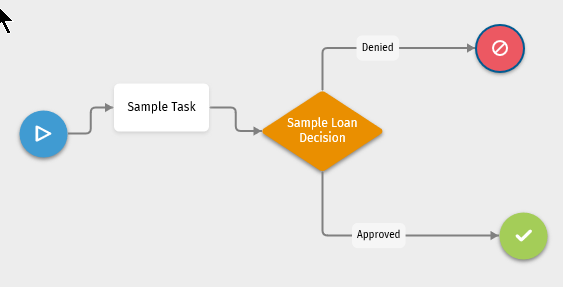
template defines two or more paths, each with a decision point.
to a
template defines two or more paths, each with a decision point.
Adding a Decision
- Add a decision by completing one of the following:
- Select and drag to the diagram.
- Select and
select New Decision or a default decision
if available.
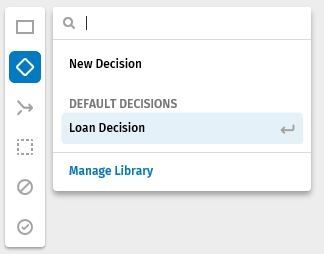
- Select and select Manage
Library. Select a decision from the
library.
- Select and drag
- Connect the decision to other items in the diagram by connecting the arrows.
- Correct any errors. For Help information, select Errors.
- Complete the Properties Pane.
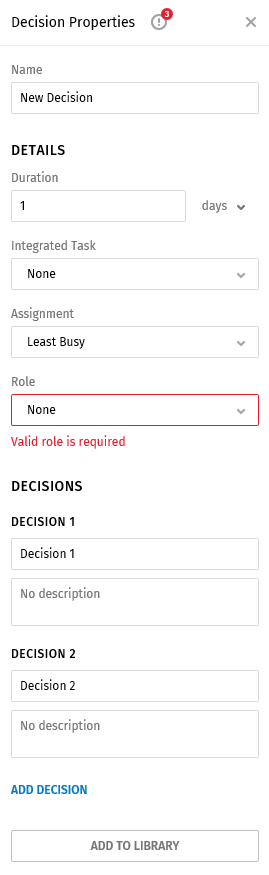
Properties Pane
- Name: The name must be a unique and is limited to one hundred characters.
- Duration: Enter the maximum number of hours, days, or weeks needed to complete the decision.
- Integrated Task: Select an integrated task if applicable.
- Assignment: Selecting an assignment determines how the task will be assigned to a user.
- Select Queue to assign the task to the next user in the selected role.
- Select Least Busy to assign the task a user in the selected role who has the least amount of tasks in their queue.
- Role: Select a role to apply to the decision. Only a user with the selected role can complete the decision.
- Decision 1: Enter a name for Decision 1. Example: Denied. Enter a description if needed.
- Decision 2: Enter a name for Decision 2. Example: Approved. Enter a description if needed.
- Add Decision: Select Add Decision if more than two decision points are
needed. Enter a name for each added Decision.
- To remove a decision point, select Remove. Remove is only available if the decision has more than two decision points. Each decision must have a minimum of two decision points.
- Add to Library: Select this option to add the decision to a library for reuse later.