Inline Graphic
An Inline Graphic is embedded into the REQ file. Inline graphics are best when the graphic is not going to change; a company logo would be an example.
The foolowing procedure explains how to add an image into a document using the InlineGraphic element, which embeds the image file into the REQ file.
- In Requirements Editor, open the REQ file and navigate to the desired position in the document.
-
Right-click the element and select .
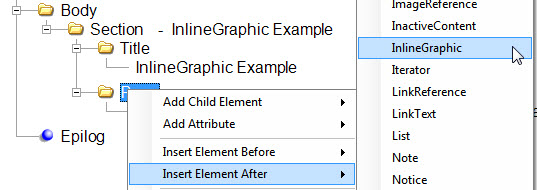
-
Right-click the newly inserted InlineGraphic element and
select Import Image.
Note: Conversely, you may export an InlineGraphic element image by right-clicking on the image and selecting Export Image.
-
In the Open dialog that appears, navigate to the location
of the image file to be assigned to the InlineGraphic and select Open.
The image appears in the REQ Outline Editor tab.
Note: The Open dialog filters the file types to display only: .jpeg, .jpg, .gif, .tif, .png, and .bmp
-
Right-click the InlineGraphic element and select . This is a best practice for ADA Compliance.
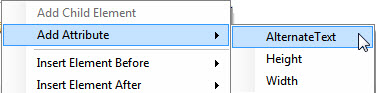
- Enter a description of the graphic image that would describe the image to someone listening to the document being read to them.
-
There are other optional attributes available for
InlineGraphics; Height, TagType and Width. The values for
the Height and Width attributes are a numeric value followed by a
unit of measure. Example: Entering .5in for the Height attribute
value would reduce the image to only consume space of one half inch high.
TagType allows you to select how the image should be formatted on the
page; automatically in the context of the line or as an H2 through H6.
The image appears in the Outline Editor tab and appears in the document when assembled.
