This section explains how to create a bulleted list in a task, either through <choices> and <choice> elements or unordered lists or <ul> elements.
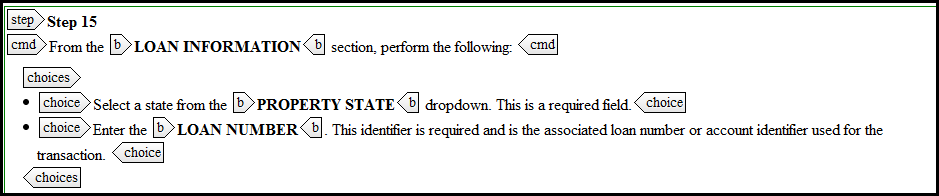
Use the <choices> element to create a list of options that the user may select to complete a task; the <choices> element can only be used within a <step> element. The <choices> element is a container for the individual <choice> elements. Use the <choice> element to develop each option that the user can select.
Use the unordered lists or <ul> element in certain locations within the task; note that constraints exist when using the <ul> element. The more common locations are presented below:
- Inside a <note> element within an <info> element,
- Inside a <p> element within the <context> element.
- Inside a <p> element in any locations where the schema allows a <p> element.
- Inside a <stepresult> element.
- Inside a <postreq> element after the <steps> element.
Using the <choices> and <choice> element
Within a task, place the cursor after the <cmd> element within a <step> element and click Enter.
- Either scroll to the <choices> element, or type "c" to navigate to those elements that begin with the letter "c." The <choices> element appears, with a single <choice> element nested inside it. Each choice represents one bulleted item. To add additional choice elements, verify the cursor resides within the <choice> element and click Enter. Select New choice at the top of the resulting list.
Using the <ul> element
Within a task, place the cursor after the desired element, and click Enter.
- Either scroll to the ul element, or type u to navigate to those elements that begin with the letter "u." The ul element appears, with an list item <li></li> element nested inside it. Each list item represents one bulleted item. To add additional list items, verify the cursor resides within the list item element and click Enter. Select New li at the top of the resulting list.
For more information on using tasks, see Tasks
Related articles