The Select Generate And Deliver option allows you to create and distribute documents to specific recipients. Click the Select Generate And Deliver option on the main Tool Suite page to begin.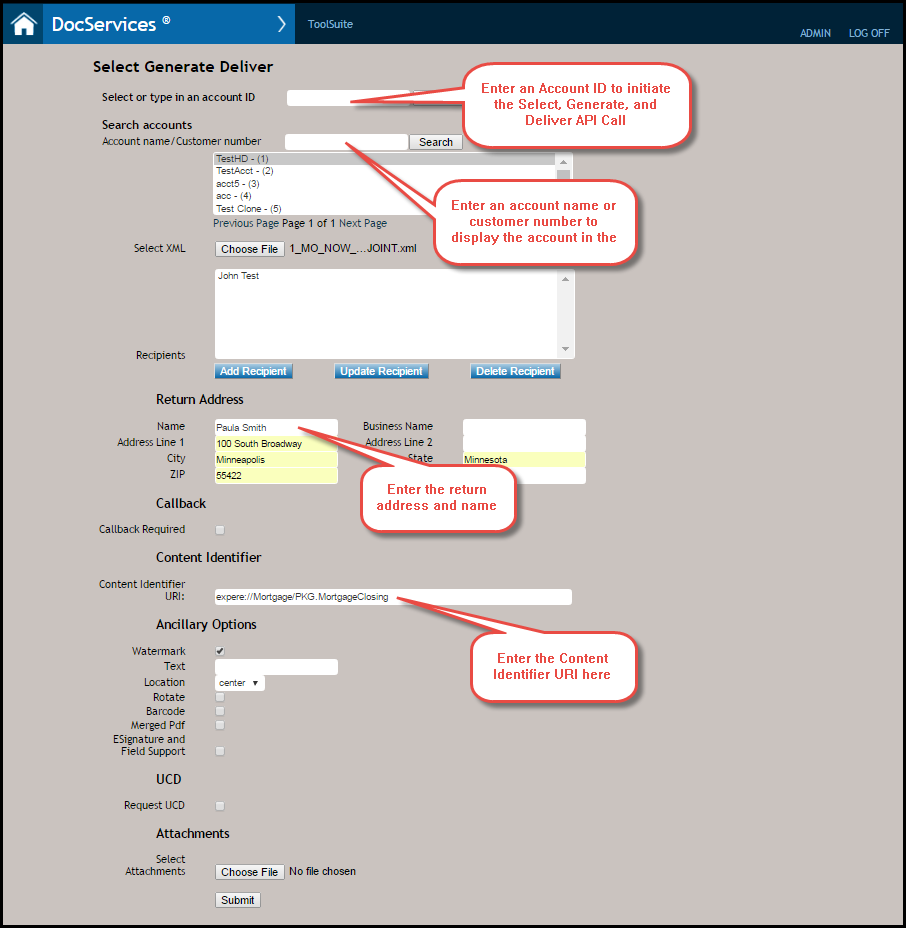
- If you know your account ID, enter the ID in the Select or type in an account ID field. To remove the ID, click Clear.
- To search for an account name or customer number, enter an account name or customer number in the Account name/Customer number field; click Search. The Account name/Customer number field will return an account list with all of the accounts that contain any portion of that search criteria. The acounts are assigned to you during your user account creation in the Enterprise Administration application.
- Click the Choose File button to the right of Select XML to browse and select the transaction .XML file.
- Click the Add Recipient button to display the Recipient Information dialog; complete the required fields. Enter a unique value in the Recipient Identifier field; each recipient should be assigned a value. Enter a value in the BRE (Business Return Envelope) field; the custom values are configured in ERP. Note: To make any changes to an existing recipient: select that recipient and click the Update Recipient button. To delete a recipient, select the recipient and click the Delete Recipient button.
- In the Return Address fields, complete the fields to specify the return address of the financial institution.
- Clicking the Callback Required checkbox displays the Callback URI, username, and password fields: enter a URI in the Callback URI (Optional) field. Complete this field to receive notifications that documents have been posted to the document rendering engine as well as document status.
- Enter the Content Identifier URI value, which consists of the Alias and Content Package. Note: The Alias is managed and maintained in the Document Generation Services management tool
- The Ancillary Options section allows you to incorporate the following additional features to the documents:
- Watermark checkbox: click this checkbox to display a subsequent field that allows you to place specific user-defined Text as a watermark across your documents. Selecting the Watermark checkbox allows for the following additional functionality:
- You can determine the location of the watermark by selecting Center, Bottom, or Top from the Location dropdown. By default, the watermark appears in the center of the page.
- Click the Rotate checkbox to rotate the watermark 45 degrees. Clicking the Rotate checkbox automatically places the watermark in the center of the page.
- Barcode checkbox: click this checkbox to define a pattern and select a specific barcode type from the corresponding dropdown. When selecting Barcode and a corresponding barcode type, select either of the following:
- Use the Use Cover Page option to indicate that cover pages will be produced for all documents that cannot handle barcodes in the tagline; for example: documents using integrated disclosure stylesheet and select static documents.
- Use the First Page Only element to place a barcode on the first page only of a document.
- Merged PDF checkbox: click this checkbox to return the documents as one master PDF file.
- ESignature and Field Support checkbox: select any of the following:
- Click the ESignature Coordinates Only checkbox to suppress eSignature fields on the form.
- Enter text in the ESignature Tooltip field to add tooltip help.
- Use the ESignature Date Support checkbox to enable or disable the date field in an eSignature. Clicking the checkbox enables the date field.
- Enter text in the ESignature Initials Tooltip field to add tooltip help.
- Click the Non-Signature Field Coordinates Only checkbox to suppress other Non-Signature fillable fields, including textboxes and checkboxes on the form.
- Click the WKES eSignature checkbox to render all initials fields as a fillable text box on the document.
- Watermark checkbox: click this checkbox to display a subsequent field that allows you to place specific user-defined Text as a watermark across your documents. Selecting the Watermark checkbox allows for the following additional functionality:
- Click the Request UCD checkbox to return Uniform Closing Dataset (UCD) data in the response file.
- Click the Oppsa Required checkbox to display all available and licensed organizations and products.
- Enter your Username and Password in the corresponding text fields.
- Click View.
- Select an Organization and Product from the corresponding dropdowns.
After selecting the organization, a list of available products appear. - Use the Select Attachment options to add any supplementary PDF files; e.g. a PDF of a house appraisal.
- Click Submit to advance to the Get Generate Results page. See Generate Results for more information.