Important: The fields on the Settings tab must be provided before
sending a package. Note: The SDX version information is displayed near
the bottom of the tab, just above the message log.
-
Click the Settings tab to view or modify your user settings.
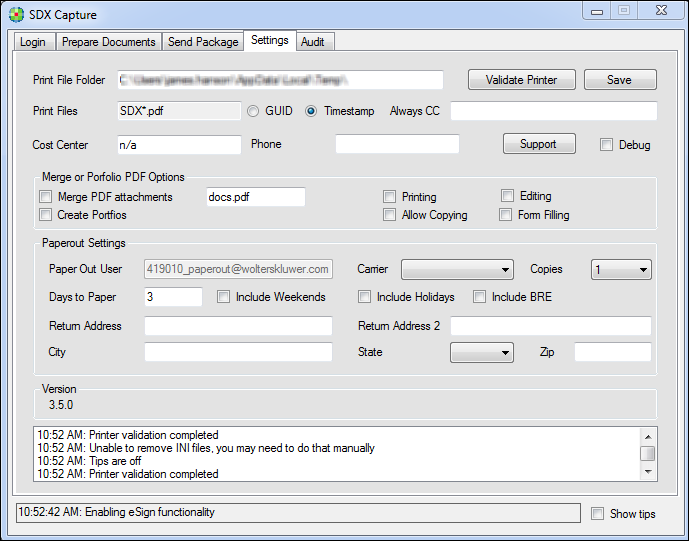
The following tables lists the features of the Settings dialog and a description for each.
Feature Description Print File Folder Indicates the set location of the Print File folder. The default setting will appear; however, you can enter a different location for this folder. Validate Printer Allows you to validate the printer and, if necessary, installs the printer driver Save Allows you to save the current settings within the screen Print Files Options: - GUID
- Timestamp (default option)
Always CC Allows you to provide an email address that will always be sent a carbon copy of the sent package Cost Center Allows you to enter a cost center code, if applicable Phone Allows you to enter your phone number, if necessary Support for internal use only Debug for internal use only Merge or Portfolio PDF Options* Merge PDF Attachments Merges all documents in the package into one file. If selected, you can use the default docs.pdf filename of provide a new name. Create Portfolios Places documents into one PDF portfolio while retaining the individual files. * This functionality is not currently used. Printing If selected, the output PDF will allow printing of the merged content. Allow Copying If selected, the output PDF will allow copying of the merged content. Editing If selected, the output PDF will allow editing of the merged content. Form Filling If selected, the output PDF will allow filling of forms of the merged content. Paperout Settings - this section only needs to be completed if you are using paper fulfillment. NOTE: Professional services will work with you to set up global settings; however, you can override your settings within Capture. Paper Out User Read Only Carrier Allows you to select the default carrier. Options are: - USPS
- UPS
- FEDEX
- USPS Priority Mail
- USPS Express Mail
Copies Allows you to select the number of copies to print Days to Paper Allows you to select the number of days before the document should be forwarded to the print center Include Weekends Allows you to include weekends in the number of days indicated in Days to Paper Include Holidays Allows you to include holidays in the number of days indicated in Days to Paper Include BRE Allows you to include a Business Reply Envelope Return Address/Return Address 2/City/State/Zip Allows you to supply a return address for printed documents Version Displays the SDX version number. Message Log Displays a log of SDX Capture activity Show tips If enabled, a description is displayed when you hover over a field name.